|
nagios的一些辅助工具很有用处,如check_ping,check_tcp等等,这里介绍一下check_ping的用法:
nagios的check_ping命令:
用法:
./check_ping
Usage: check_ping -H <host_address> -w <wrta>,<wpl>% -c <crta>,<cpl>%
[-p packets] [-t timeout] [-L] [-4|-6]
具体如下:
-H 主机地址
-w WARNING 状态: 响应时间(毫秒),丢包率 (%) 阀值
-c CRITICAL状态: 响应时间(毫秒),丢包率 (%) 阀值
-p 发送的包数 默认5个包
-t 超时时间 默认10秒
-4|-6 使用ipv4|ipv6 地址 默认ipv4
如:
1、正常:
./check_ping -H www.google.com -w 100.0,20% -c 200.0,50% -p 3 -t 2
PING OK – Packet loss = 0%, RTA = 1.49 ms
命令执行结果返回: echo $? 为 0
2、WARNING :
./check_ping -H www.google.com -w 0.1,20% -c 200.0,50% -p 3 -t 2
PING WARNING – Packet loss = 0%, RTA = 1.71 ms
命令执行结果返回: echo $? 为 1
3、CRITICAL
./check_ping -H www.google.com -w 0.1,20% -c 0.9,50% -p 3 -t 2
PING CRITICAL – Packet loss = 0%, RTA = 1.60 ms
命令执行结果返回: echo $? 为 2
返回结果为:状态 丢包率 ping响应时间
因为check_ping的返回值非常清晰,
可以在其他程序中调用check_ping命令,作为辅助的网络检测工具。 |
分类目录归档:监控系统
给nagios监控服务器添加图标
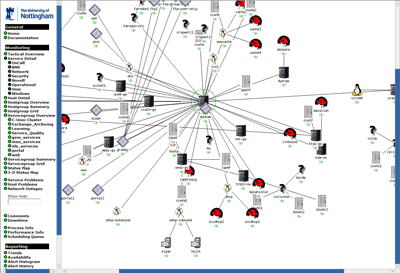
今天看了学校总部的Nagios 2.0 statusmap,感觉其中的图标配置很不错,于是开始研究把自己配置的3.0版本也加上。默认安装完成后的Nagios并没有对Statusmap做较好的美化,图标显示都是疑问符号。由于3.0.1相对于2.0做了较大改动,早期版本中定义hostextinfo已经不可用。通过阅读官方文档,得知在host定义中有四个变量可选,用于指定每一个host的图标文件名,默认的存储位置是/usr/local/nagios/share/images/logos
icon_image: 可以使用GIF, PNG,或者是JPG文件,推荐图像尺寸为40×40
icon_image_alt: 即为HTML语法中关于image元素的ALT属性值
vrml_image: Nagios提供使用VRML语言绘制三维图像功能,这里不要使用透明图片(PNG, GIF),最好使用JPG
statusmap_image: 提供给statusmap CGI脚本使用的图片,服务器要支持GD,这个文件的类型为gd2
Nagios 3安装包中没有提供足够的图片文件,但是NagiosExchange为我们提供了很多用于Nagios的图标以及界面模板,可以从中选取下载。
nagios自定义变量问题,用户自定制对象变量
用户通常想在主机、服务或联系人的对象里加入自已定制的变量,这些变量象SNMP共同体名、MAC地址、AIM用户名、Skype帐号和街道名称等等,可能有各种各样的东西无法列完。这样会使Nagios不具备通用性并且无法保持一个特定的架构。Nagios试图更为柔性化,这就意味着需要处理这种情况,例如在Nagios的主机对象定义中,”address”是一个IP地址也可以是任何东西,只要对使用者而言是个可读可操作的,无论用户怎么设置都行。
但还是有必要在Nagios配置文件中提供一种可供管理和保存的处理方法而不是与现有变量域混用的方法。Nagios试图在对象的定义中引用用户自定制变量来解决这个问题。用户自定制变量的方法可以让用户在主机、服务和联系人对象定义里加入属性,在通知、事件处理和对主机与服务的检测中使用这些变量。
使用用户自定制变量需要注意如下几个要点:
这有一个如何在对象中定义不同类型的用户自定制变量的例子:
define host{
		host_name	linuxserver
		_mac_address	00:06:5B:A6:AD:AA	; <-- Custom MAC_ADDRESS variable
		_rack_number	R32			; <-- Custom RACK_NUMBER variable
		...
		}
define service{
		host_name	linuxserver
		description	Memory Usage
		_SNMP_community	public			; <-- Custom SNMP_COMMUNITY variable
		_TechContact	Jane Doe		; <-- Custom TECHCONTACT variable
		...
		}
define contact{
		contact_name	john
		_AIM_username	john16			; <-- Custom AIM_USERNAME variable
		_YahooID	john32			; <-- Custom YAHOOID variable
		...
		}
在Nagios的检测、通知等的脚本和执行程序里可以引用用户自定制变量,通过使用宏或是环境变量来实现。
为防止混淆不同对象类型中的用户定制变量,Nagios在宏和环境变量的名字里,对用户定义的主机、服务或是联系人的变量名之前分别加上了”_HOST”、”_SERVICE”或”_CONTACT”以示区分。下面的表格中给出前面例子中的用户自定制变量在宏和环境变量这中的可引用的命名。
| 对象类型 | 变量名 | 宏名 | 环境变量 |
|---|---|---|---|
| 主机 | MAC_ADDRESS | $_HOSTMAC_ADDRESS$ | NAGIOS__HOSTMAC_ADDRESS |
| 主机 | RACK_NUMBER | $_HOSTRACK_NUMBER$ | NAGIOS__HOSTRACK_NUMBER |
| 服务 | SNMP_COMMUNITY | $_SERVICESNMP_COMMUNITY$ | NAGIOS__SERVICESNMP_COMMUNITY |
| 服务 | TECHCONTACT | $_SERVICETECHCONTACT$ | NAGIOS__SERVICETECHCONTACT |
| 联系人 | AIM_USERNAME | $_CONTACTAIM_USERNAME$ | NAGIOS__CONTACTAIM_USERNAME |
| 联系人 | YAHOOID | $_CONTACTYAHOOID$ | NAGIOS__CONTACTYAHOOID |
象标准的主机、服务或联系人对象里的变量一样,用户自定制变量同样可以继承。
ucd-snmp和net-snmp是什么
snmp—简单网络管理协议
ucd-snmp和net-snmp—ucd-snmp源自于卡耐基.梅隆大学的SNMP软件包CMU snmp 2.1.2.1, 由加州大学Davis分校(University of Califonia at Davis)开发与维护, 所以命名为ucd-snmp. 2000年11月ucd-snmp项目转到由SourceForge(www.sourceforge.net)管理, 并更名为net-snmp. ucd-snmp 4.2 是以ucd-snmp命名的最后的一个主要版本. 也就是说, 以后发布的 ucd-snmp 4.2.x仅仅修改软件包中的Bugs; 而大的修改版本将以net-snmp命名, 并发布为5.x. ucd-snmp 4.2.1是最新的发布版本, 于2001年4月4日发布.
nagios的插件安装
安装nagios-plugin的时候,附带的参数说明:
[root@localhost nagios-plugins-1.4.13]# ./configure –with-nagios-user=nagios –with-nagios-group=nagios –prefix=/usr/local/nagios –with-ping-command=”/bin/ping” –with-mysql –without-ipv6
以上我在操作的过程中mysql提示找不到库文件,出错信息如下
“configure: WARNING: Skipping mysql plugin
configure: WARNING: install mysql client libs to compile this plugin (see REQUIREMENTS).”
后来把mysql_config复制到/usr/lib/pkgconfig后,顺利configure,看来还是路径的问题,其实在nagios-plugins-1.4.13的目录下的“REQUIREMENTS”文件已经详细说明了“check_mysql, check_mysql_query:
– Requires the MySQL libraries available from
http://www.mysql.org/
Lib: libmysql, libmysqlclient
Redhat Powertools Source: mysql-3.20.32a-3.i386.rpm, mysql-devel-3.20.32a-3.i386.rpm (these seem to be broken, howev
er)
RPMS from www.mysql.org work better
Must have mysql_config in PATH or specified with –with-mysql=DIR for DIR/bin/mysql_config”
nagios安装,网上太多了,这个是自己安装后的手记。
nagios安装
下载:wget http://prdownloads.sourceforge.net/sourceforge/nagios/nagios-3.2.0.tar.gz
安装:
tar -zxvf nagios-3.2.0.tar.gz
cd nagios-3.2.0
./configure –prefix=/usr/local/nagios –with-command-group=nagcmd
make all
make all完毕后有如下提示:
“If the main program and CGIs compiled without any errors, you
can continue with installing Nagios as follows (type ‘make’
without any arguments for a list of all possible options):
make install
– This installs the main program, CGIs, and HTML files
make install-init
– This installs the init script in /etc/rc.d/init.d
make install-commandmode
– This installs and configures permissions on the
directory for holding the external command file
make install-config
– This installs *SAMPLE* config files in /usr/local/nagios/etc
You’ll have to modify these sample files before you can
use Nagios. Read the HTML documentation for more info
on doing this. Pay particular attention to the docs on
object configuration files, as they determine what/how
things get monitored!
make install-webconf
– This installs the Apache config file for the Nagios
web interface”
依次运行如下命令:
make install
make install-init
make install-commandmode
make install-config
make install-webconf
给nginx添加认证:
修改nginx的配置文件如下:
location /nagios/ {
alias /usr/local/nagios/share/;
index index.html index.htm index.php;
auth_basic “nagios”;
auth_basic_user_file /usr/local/nagios/etc/htpasswd admin
}
生成htpasswd文件:
/usr/bin/htpasswd -c /usr/local/nagios/etc/htpasswd admin
其中htpasswd是apache提供的工具
配置nagios
nagios web界面提示
It appears as though you do not have permission to view information for any of the services you requested…
打开cgi.cfg配置文件,里面有个参数:
use_authentication=1
为了保障系统的安全性,nagios设置了这个参数,默认为1,改为0即可
配置:
下载插件:
wget http://prdownloads.sourceforge.net/sourceforge/nagiosplug/nagios-plugins-1.4.13.tar.gz
tar -zxvf nagios-plugins-1.4.13.tar.gz
cd nagios-plugins-1.4.13
./configure –prefix=/usr/local/nagios
make
make install
配置附件:
wget http://prdownloads.sourceforge.net/sourceforge/nagios/nrpe-2.12.tar.gz
tar -zxvf nrpe-2.12.tar.gz
cd nrpe-2.12
./configure –prefix=/usr/local/nagios
make all
make install-plugin
make install-daemon
make install-daemon-config
/usr/local/nagios/bin/nrpe -c /usr/local/nagios/etc/nrpe.cfg -d
返回:[root@localhost nrpe-2.12]# /usr/local/nagios/libexec/check_nrpe -H localhost
NRPE v2.12
完成。
配置perl,cgi,nginx
源码安装ntop与启动
操作系统:CentOS
软件:ntop-3.3.10
其它的一些关联包,例如rrdtool,pcap等
建立启动ntop的账户
#useradd ntop
#passwd ntop
安装ntop
#cd /usr/local/src
#wget http://downloads.sourceforge.net/project/ntop/ntop/ntop-3.3.10/ntop-3.3.10.tar.gz
#tar -zxvf ntop-3.3.10.tar.gz
#cd ntop-3.3.10
#./autogen.sh –prefix=/usr/local/notp –with-rrd-home=/usr/local/rrdtools
注释:rrdtool我是编译的,所以这里需要指定rrdtool的目录位置,其它的关联包我是yum安装的,所以没有指定路径
#make
#make install
安装完成
启动ntop
#/usr/local/ntop/bin/ntop -P /usr/local/ntop/var/ -u ntop -A
按照提示输入密码
正常启动
#/usr/local/ntop/bin/ntop -P /usr/local/ntop/var -u notp -d
完成,当然,您可以再添加一些参数来启动ntop,具体的参数网上到处都有,我这里只有一块网卡,做了端口镜像,所以也没有带-i ethX的参数
以上如有问题,欢迎指正。

